Tuesday, March 20, 2018

How to Import Icecream Recordings to Premiere Pro CC for Editing?

Q: "I have captured a lots of screen videos with Icecream recorder, I'd like import them to Premiere Pro CC for editing, but failed to do the steps. Any suggestions?"

Icecream Screen Recorder is a screen recording software recording any on-screen activity and saving it as a video file or screenshot. Thanks to a number of powerful features, users can record the screen to create video tutorials, record both audio and microphone, capture webcam, record games or streaming videos, schedule screen recording, take screenshots of a selected area. However, some users complained that they can't import Icecream recordings to Premiere Pro CC for editing. Thus, this tutorial aims at solving your problem by providing the useful tips.

In fact, Icecream recorder can output videos in MP4, AVI or WebM format, while these formats are not edit-friendly with Premiere Pro CC. To solve the problem, you can convert Icecream recordings to Premiere Pro CC more compatible MPEG-2, WMV formats before editing. Thus, a professional video converter like Brorsoft Video Converter Ultimate (Win /Mac) is needed here.

With it, users can effortlessly encode Icecream videos to Adobe Premiere friendly codec MPEG-2 with zero quality loss. In addition, it also offers optimized codecs for other NLEs, including: Apple Intermediate Codec(AIC) for iMovie, ProRes for Final Cut Pro X, DNxHD for Avid MC and more to satisfy your different needs.

Free download best video converter:
video-converter-trail imedia-converter-for-mac-trail

Steps to Convert Icecream Recordings for Editing with Premiere Pro CC

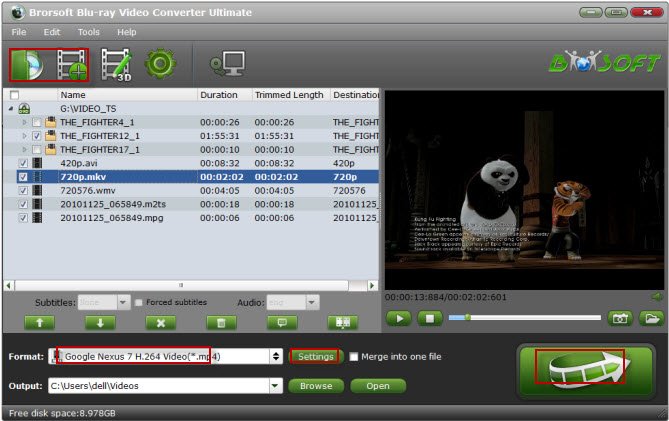
Step 1. Install and launch the best video converter, simply click Load File to load your Icecream MP4 videos to the program.
import-mts-to-imovie.gif

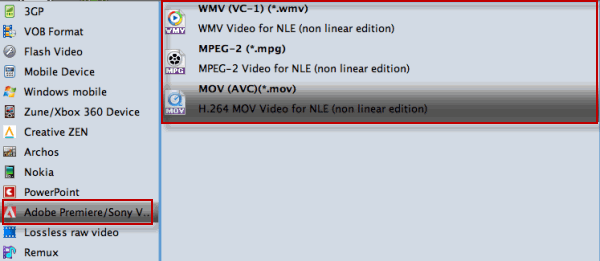
Step 2. Press the "Format" box and select Adobe Premiere/Sony Vegas - > MPEG-2(*.mpg) as output format for Premiere Pro CC and then set the output destination as you want.
dvd-to-premiere-pro-format.gif
Tip: If you like, you can click "Settings" button right besides "Format" and enter "Profile Settings" panel to adjust video size, bit rate, frame rate, sample rate and audio channels.

Step 3. When everything is ok, click the "Convert" button to convert Icecream recordings to Premiere Pro CC edit-friendly formats. Once finished, you'll get the converted videos. Now, you're able to import and edit the converted Icecream recordings in Premiere Pro CC/CS6/CS5 smoothly.


Read More:

Can't Import YouTube WebM Videos to Premiere Pro/After Effects? -The Solution
How to Downscale/Convert Sony AX100 4K XAVC S Files to 1080P MP4 or MKV for Sharing?
How to Play DVD Video_TS Files on PC/Mac Smoothly?

Thursday, March 1, 2018

Can't Import YouTube WebM Videos to Premiere Pro/After Effects? -The Solution

The following article will provide you the solid soltuions to import YouTube WebM videos to Premiere Pro/After Effects for editing smoothly.

YouTube is used by millions to watch movie trailers, music videos, and other similar content, it can also be used to watch TV and full-length movies. Most one YouTube online videos are saved as WebM format, which is dedicated to developing a high-quality, open video format for the web that's freely available to everyone. However, when you try to import the download YouTube WebM files to Premiere Pro or After Effects and do some additional editing, you'll disappointed to find these YouTube WebM files can't be load correctly.

The best solution to import and edit YouTube WebM videos to Premiere Pro/AE, is to convert WebM to Premiere Pro/After Effects more editing-friendly format i.g. MPEG-2, which ensures the best results when working with Premiere Pro/AE. To save your time, Brorsoft Video Converter Ultimate (Windows /Mac) is highly recommended here.

This all-in-one video/Blu-ray/DVD converter can quickly and losslessly convert YouTube WebM videos to Adobe Premiere Pro/After Effects compatible video formats for you. Besides, it also supports convert Blu-ray, DVD, H.265/HEVC, M2TS, MP4, MKV, AVI, MXF, MTS, etc to more NLE software including: Final Cut Pro X, Sony Vegas Pro, Pinnacle Studio and Avid Media Composer supported format without losing quality.

Free download the best WebM Video Converter:
video-converter-trail imedia-converter-for-mac-trail

Steps to Convert YouTube WebM for Editing in Premiere Pro/After Effects

Here, Windows version Video converter ultimate taken as example, Mac share the same way except tiny differences on interface.

Step 1. Install and launch the best WebM video converter, simply click "Load File" to load your YouTube WebM videos to the program.
video-converter-ultimate.jpg
Step 2. Hit the "Format" box and select Adobe Premiere/Sony Vegas - > MPEG-2(*.mpg) as output format and then set the output destination as you want.
dvd-to-premiere-pro-format.gif
Tip: You can click “Settings” button to adjust output parameters, including the Bitrate of Video and Audio, the Codec of Video and Audio, Video Size, Sample Rate, Frame Rate, Audio Channels, etc.

Step 3. At last, click the "Convert" button to convert YouTube WebM files to MPEG-2 for Premiere Pro and After Effects. Once finished, you can click “Open” button to get the generated MPEG-2 files, then import and edit YouTube WebM videos with Premiere Pro and After Effects without hassle.


Read More:

How to Downscale/Convert Sony AX100 4K XAVC S Files to 1080P MP4 or MKV for Sharing?
How to Import DVD Clips to Corel VideoStudio for Editing?
Fix Camtasia Studio 7/8 Not Working on MP4 Files