Thursday, June 7, 2018

Can't Import GoPro Hero5 Footage into iMovie- The Solutions

When I try to import some 4K video clips from GoPro Hero5 into the editing software iMovie on Mac, however the iMovie 11 won't import the GoPro MP4 video files. They play fine on Quicktime Player on the Mac, but iMovie refuses to import them. So I goole the question like can't import GoPro Hero5 footage into iMovie online, some positive solutions pop up:

Solution 1. Use QuickTime Pro 7
Convert GoPro files with QuickTime Pro 7 into QuickTime format file. Good luck. iMovie can import the output .mov videos. But it takes long time. And it cost so much quality.

Solution 2. Transcode GoPro Hero5 4K Videos to AIC for iMovie
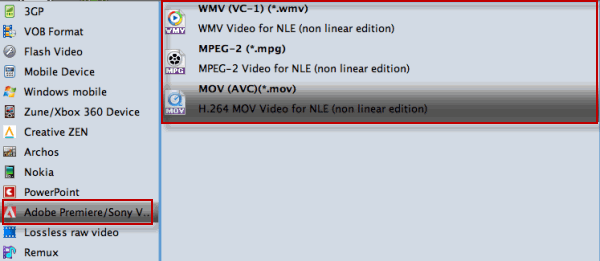
As far as we know, iMovie natively supports limited video/audio formats as input, among them, Apple InterMediate Codec(*.mov) should be one of the best choice. So I try the convert GoPro Hero5 4K Videos to iMovie edit-friendly format via third party video converter. To finish the task, Brorsoft Video Converter for Mac is highly recommended here.

With this Gopro 4K video converter, you can effortlessly transcode Gopro Hero5 4K MP4 to AIC MOV, which will create an iMovie friendly file format keeping the original 4k quality or downsize 4K to 1080p as you want. Besides, this software can also export DNxHD for Avid, MPEG-2 for Premiere Pro/Element, ProRes for Final Cut Pro and more NLE systems for native editing.

download_mac.gif

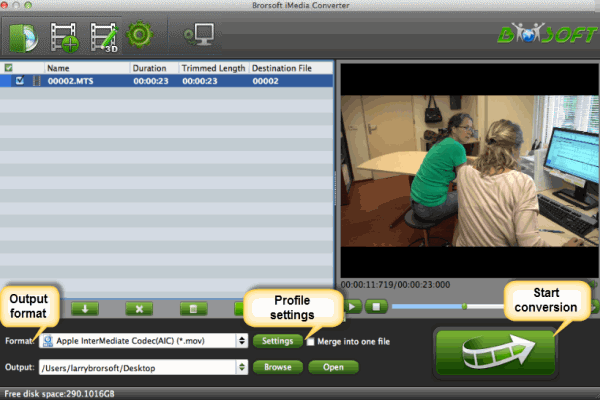
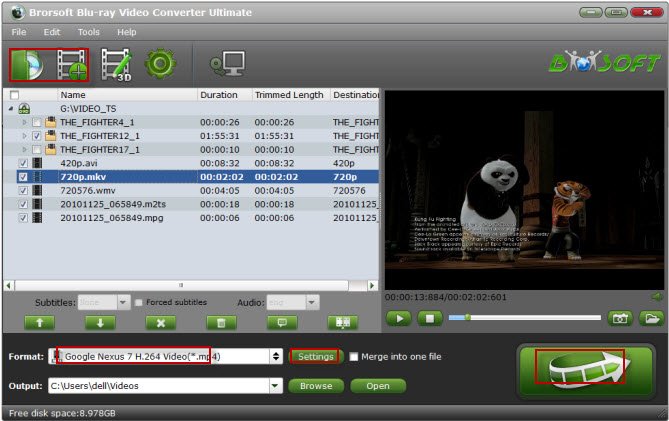
Step 1. Import Gopro Hero 5 4K MP4
Install and launch the GoPro 4K Video converter and load source GoPro Hero 5 4K video clips to it. This video converter supports batch conversion.


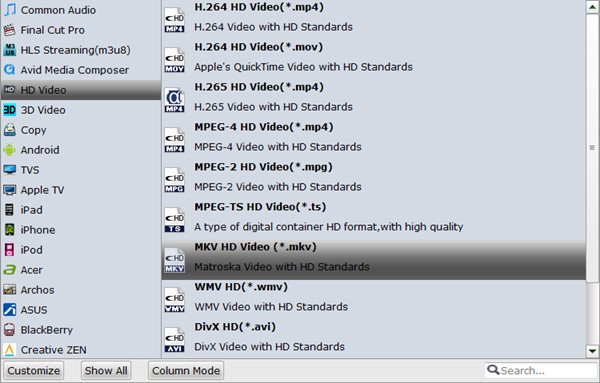
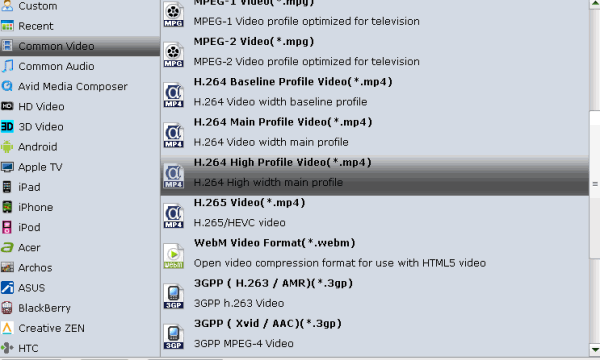
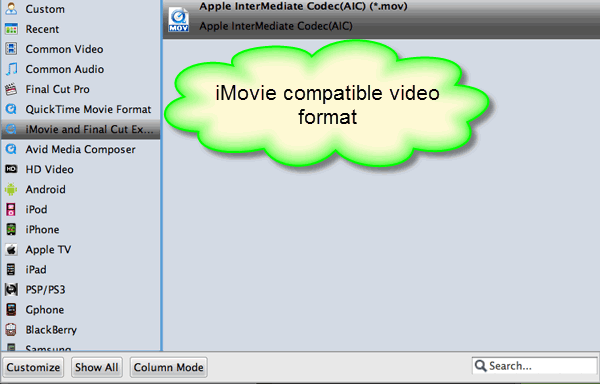
Step 2. Select AIC as output format
Click the “Format” bar to select output format “iMovie and Final Cut Express > Apple Intermediate Codec(AIC) (*.mov)” as the best compatible video format for editing 4K in iMovie.


Step 3. Start the conversion
Tap the “Convert” button to transcode/convert GoPro 4K MP4 video to AIC .mov for iMovie. Once the conversion is finished, click “Open” button to get the exported files and then import the converted GoPro Hero5 4K files to iMovie for additional editing a breeze.

Read more:

Wednesday, May 23, 2018

Best DVD to Android Converter 2018

With the Android tablets and phones blooming, more and more users can easily enjoy hottest movies, TV shows and even 360 degree videos from YouTube, Facebook, etc. But if you want to put and backup all of your DVD collections into an Android devices for viewing during a trip, you may need some professional DVD to Android converter for help.

Solution 1. Brorsoft DVD Ripper

Brorsoft DVD Ripper is one of the top-ranked DVDto Android converter that can quickly convert any (protected) DVD to Android phones or tablets compatible video files in fast ripping speed and excellent output video quality. Plus, it has the optimal presets for Samsung, Kindle Fire HD, Galaxy Tab, HTC, Sony, etc. If you are running on Mac OS X, please turn to the equivalent Mac version entitled Brorsoft DVD Ripper for Mac.
 dvd-windows-8-steps.gif
dvd-ripper-for-windows-trail dvd-ripper-for-mac-trail

Solution 2. Brorsoft Video Converter Ultimate

Brorsoft Video Converter Ultimate is an all-in-one Blu-ray/DVD/Video converter that cna fast convert any Blu-ray, DVD and videos to Android tablets and phones supported mp4, mkv video formats without losing qualit. Besides, it provides customized settings for more Android devices like: Samsung, Amazon, HTC, Google device, Sony, Blackberry and more in a straightforward way. For Mac users, please turn to Brorsoft iMedia Converter for Mac.

video-converter-trail imedia-converter-for-mac-trail

Guide: Rip DVD to Android Tablet/Phone Supported Video Format

Step 1. Import DVD Movies
Click the disc button to load the DVD movies. You can also load folders, ISO/IFO files. At the bottom, you can select your desired subtitle and audio track.
dvd-windows-8-steps.gif

Step 2. Choose output format
Select an Android friendly format, e.g. H.264 .mp4 for conversion. Basically the "Common Video -> H.264 Video (*.mp4)" is a universal format for Android tablets and smartphones. Besides, there are optimized formats for Samsung, Motorola, Acer, Asus, Sony, Toshiba, HTC, etc branded Android devices; choose a proper one as you need. Or depends on your device, you can choose a suitable video format from "Android" catalogue.
select-format
Tip: If you think the video size this not suitable for your Android Tablet or Phone, you can first choose any one of the provided type, then change the settings. Please remember the file size is based more on bitrate than resolution which means bitrate higher results in bigger file size, and lower visible quality loss.

Step 3. Start Ripping DVD for Android
When all the settings are OK, click "Convert" button to rip/convert DVD movies to Android tablet/phone supported video formats.
Once the conversion is complete, click "open" to locate the ripped video files. After that, you can connect your Android phone or tablet to computer via a USB device and transfer the videos to your device for playback smoothly.

Read more:

Copy and Backup DVD Collections to Plex Media Server
How to Import Icecream Recordings to Premiere Pro CC for Editing?
Can't Import YouTube WebM Videos to Premiere Pro/After Effects? -The Solution

Thursday, May 10, 2018

Copy and Backup DVD Collections to Plex Media Server

Q: "I can not figure out how to add a DVD movie to my Plex libray. I'm about to go insane. Watched every youtube video and cant seem to figure out how to do this to a nas device. Every video I watch is way out dated i guess. If anyone has a current link to a video that would be great. Any help would be appreciated."

Plex is a piece of very powerful media streaming software for the home. Based on a fork of the XBMC framework (now known as Kodi), the software turns your personal computer or NAS into a media server that enables access to all your films, photos and music, from a multitude of devices via a beautiful and slick user interface. For those who have problems to copy and rip DVD collections onto Plex media server, you have come to the right place. Read this post to get some useful clues.

In fact, Plex will automatically transcode and convert the incompatible video/audio formats into it's preferred H.264 MP4 during the streaming process, but it will cost lots of your CPU and need powerful network speed. In addition, most of commercial DVD discs are encrypted with heavy copy protections, and Plex will failed to convert and read DVD videos from your PC/Mac. To solve this problems, we suggest you transcode and rip DVD to Plex supported video formats in advance.

To finish the task, a professional DVD to Plex converter is neede. Here, Brorsoft DVD Ripper is the bee's knees, which can help you finish DVD conversion bypassing DVD copy protection. With it, you can convert DVD to Plex supported video formats and other popular formats like MP4, MOV, MKV, FLV, WMV, AVI, etc without losing quality. Best of all, it allows you to copy your DVD to hard drive with original structure or main movie only. If you're using a Mac, please turn to Brorsoft DVD Ripper for Mac, which enables you to convert DVD to Plex Media Server on Mac OS X (High Sierra).

Free download DVD to Plex Converter:
download_windows.gif download_mac.gif (Note: Click here for OS X 10.5)

Step 1. Import DVD movies
Insert your DVD disc to the drive, then launch the DVD ripping software and click the "Load Disc" button to have the DVD content imported. You can also add VIDEO_TS folder, DVD ISO files are the source files for converting.
backup-dvd.gif

Step 2. Set output format
Click Format bar and choose H.264 MP4 from Common Video, which can be recognized by Plex well. MKV is also a good choice; as a container format it takes whatever you give it.
new-mp4-format.gif
Tips: Simply click Settings bar and you can tweak the settings to your satisfaction and even save it as preset.

Step 3. Start ripping DVD to Plex
With above settings, tap the "Convert" button at the bottom of the main interface to start the conversion. It will automatically convert DVD/VIDEO_TS/ISO to Plex Media Server compatible video files.
Once the conversion is finished, click "Open" to quickly find the converted movies. Then, copy and backup the ripped files to Plex media server for streaming smoothly.

Read more:

How to Import Icecream Recordings to Premiere Pro CC for Editing?
Can't Import YouTube WebM Videos to Premiere Pro/After Effects? -The Solution
How to Downscale/Convert Sony AX100 4K XAVC S Files to 1080P MP4 or MKV for Sharing?

Tuesday, March 20, 2018

How to Import Icecream Recordings to Premiere Pro CC for Editing?

Q: "I have captured a lots of screen videos with Icecream recorder, I'd like import them to Premiere Pro CC for editing, but failed to do the steps. Any suggestions?"

Icecream Screen Recorder is a screen recording software recording any on-screen activity and saving it as a video file or screenshot. Thanks to a number of powerful features, users can record the screen to create video tutorials, record both audio and microphone, capture webcam, record games or streaming videos, schedule screen recording, take screenshots of a selected area. However, some users complained that they can't import Icecream recordings to Premiere Pro CC for editing. Thus, this tutorial aims at solving your problem by providing the useful tips.

In fact, Icecream recorder can output videos in MP4, AVI or WebM format, while these formats are not edit-friendly with Premiere Pro CC. To solve the problem, you can convert Icecream recordings to Premiere Pro CC more compatible MPEG-2, WMV formats before editing. Thus, a professional video converter like Brorsoft Video Converter Ultimate (Win /Mac) is needed here.

With it, users can effortlessly encode Icecream videos to Adobe Premiere friendly codec MPEG-2 with zero quality loss. In addition, it also offers optimized codecs for other NLEs, including: Apple Intermediate Codec(AIC) for iMovie, ProRes for Final Cut Pro X, DNxHD for Avid MC and more to satisfy your different needs.

Free download best video converter:
video-converter-trail imedia-converter-for-mac-trail

Steps to Convert Icecream Recordings for Editing with Premiere Pro CC

Step 1. Install and launch the best video converter, simply click Load File to load your Icecream MP4 videos to the program.
import-mts-to-imovie.gif

Step 2. Press the "Format" box and select Adobe Premiere/Sony Vegas - > MPEG-2(*.mpg) as output format for Premiere Pro CC and then set the output destination as you want.
dvd-to-premiere-pro-format.gif
Tip: If you like, you can click "Settings" button right besides "Format" and enter "Profile Settings" panel to adjust video size, bit rate, frame rate, sample rate and audio channels.

Step 3. When everything is ok, click the "Convert" button to convert Icecream recordings to Premiere Pro CC edit-friendly formats. Once finished, you'll get the converted videos. Now, you're able to import and edit the converted Icecream recordings in Premiere Pro CC/CS6/CS5 smoothly.


Read More:

Can't Import YouTube WebM Videos to Premiere Pro/After Effects? -The Solution
How to Downscale/Convert Sony AX100 4K XAVC S Files to 1080P MP4 or MKV for Sharing?
How to Play DVD Video_TS Files on PC/Mac Smoothly?

Thursday, March 1, 2018

Can't Import YouTube WebM Videos to Premiere Pro/After Effects? -The Solution

The following article will provide you the solid soltuions to import YouTube WebM videos to Premiere Pro/After Effects for editing smoothly.

YouTube is used by millions to watch movie trailers, music videos, and other similar content, it can also be used to watch TV and full-length movies. Most one YouTube online videos are saved as WebM format, which is dedicated to developing a high-quality, open video format for the web that's freely available to everyone. However, when you try to import the download YouTube WebM files to Premiere Pro or After Effects and do some additional editing, you'll disappointed to find these YouTube WebM files can't be load correctly.

The best solution to import and edit YouTube WebM videos to Premiere Pro/AE, is to convert WebM to Premiere Pro/After Effects more editing-friendly format i.g. MPEG-2, which ensures the best results when working with Premiere Pro/AE. To save your time, Brorsoft Video Converter Ultimate (Windows /Mac) is highly recommended here.

This all-in-one video/Blu-ray/DVD converter can quickly and losslessly convert YouTube WebM videos to Adobe Premiere Pro/After Effects compatible video formats for you. Besides, it also supports convert Blu-ray, DVD, H.265/HEVC, M2TS, MP4, MKV, AVI, MXF, MTS, etc to more NLE software including: Final Cut Pro X, Sony Vegas Pro, Pinnacle Studio and Avid Media Composer supported format without losing quality.

Free download the best WebM Video Converter:
video-converter-trail imedia-converter-for-mac-trail

Steps to Convert YouTube WebM for Editing in Premiere Pro/After Effects

Here, Windows version Video converter ultimate taken as example, Mac share the same way except tiny differences on interface.

Step 1. Install and launch the best WebM video converter, simply click "Load File" to load your YouTube WebM videos to the program.
video-converter-ultimate.jpg
Step 2. Hit the "Format" box and select Adobe Premiere/Sony Vegas - > MPEG-2(*.mpg) as output format and then set the output destination as you want.
dvd-to-premiere-pro-format.gif
Tip: You can click “Settings” button to adjust output parameters, including the Bitrate of Video and Audio, the Codec of Video and Audio, Video Size, Sample Rate, Frame Rate, Audio Channels, etc.

Step 3. At last, click the "Convert" button to convert YouTube WebM files to MPEG-2 for Premiere Pro and After Effects. Once finished, you can click “Open” button to get the generated MPEG-2 files, then import and edit YouTube WebM videos with Premiere Pro and After Effects without hassle.


Read More:

How to Downscale/Convert Sony AX100 4K XAVC S Files to 1080P MP4 or MKV for Sharing?
How to Import DVD Clips to Corel VideoStudio for Editing?
Fix Camtasia Studio 7/8 Not Working on MP4 Files

Monday, February 5, 2018

How to Downscale/Convert Sony AX100 4K XAVC S Files to 1080P MP4 or MKV for Sharing?

downscale-and-convert-sony-ax100-4k-xavcs-to-1080p-mp4-mkv.jpg
The Sony FDR-AX100 blurs the line between professional and consumer camcorders and does so at an aggressive price point. It is small, easy to use, relatively affordable and it also has a large sensor, great lens and tons of manual controls. It is capable of recording great 3840×2160 4K video in Sony’s quite impressive XAVC S codec at 24 and 30 fps. However, the Sony AX100 4K XAVC S files are usually large in size, and most social apps don't support this formats. So, it make sense to downscale/convert Sony AX100 4K XAVC S to 1080P MKV/MP4 for sharing or storing.

After seraching online, there're so many 4K/HD video converter and we don't know which one is best. With several of our testing, the all-in-one Brorsoft Video Converter Ultimate is highly recommended here. With it, you have no hassle to import 4K/HD XAVC S videos and downscale/convert them to 1080p MP4, MKV, AVI, WMV, QuickTime MOV, etc formats without losing quality.

Besides, you're also allowed to convert video or DVD/Blu-ray for sharing on YouTube, Vimeo, Instagram and more. With a built-in editor, you can easily personalize your DVD/Blu-ray and video to get the very part and effect you want. It's equivalent Mac version, please turn to Brorsoft iMedia Converter for Mac.

Free download best AX100 4K Video Converter:
video-converter-trail imedia-converter-for-mac-trail

Steps to Convert VOB to H.264 MP4 for Playing on Panasonic TV

Here, Windows version Blu-ray ripper taken as example, Mac share the same way except tiny differences on interface.


Step 1. Load Sony AX100 4K Videos

Install and launch the best AX100 4K Video Converter, simply click "Load File" to load your Sony AX100 4K XAVC S videos to the program.
video-converter-ultimate.jpg

Step 2. Choose HD output formats

Click the Format drop-down menu and and choose the MKV HD Video(*.mkv), H.264 HD Video(*mp4) from the HD Video category as the output format.
rip-blu-ray-to-hd-mkv.jpg
Tip: Simply click Settings bar and you can tweak the settings to meet your needs.


Step 3. Start the conversion

 Last step is to click the Convert button at the bottom of the main interface to start the conversion. It will automatically downscale and convert Sony AX100 4K XAVC S to 1080P HD MP4, MKV format.
Once the conversion is finished, click Open to quickly find the converted movies. Then, sharing on social apps or storing on PC/Mac's hard drive as you like.


Related Articles:

How to Import DVD Clips to Corel VideoStudio for Editing?
Fix Camtasia Studio 7/8 Not Working on MP4 Files
How to Edit iPhone 8/7/6 Videos with Pinnacle Studio Smoothly?

Wednesday, January 17, 2018

How to Play DVD Video_TS Files on PC/Mac Smoothly?

Q: "I had a DVD for work with  VIDEO_TS format and it would not play in My PC. Any Solutions?"

In general, Video_TS folder contains all the video and data files ripped from a DVD, some regular video player apps can't read and play it well. In order to play DVD Video_TS files on PC or Mac with ease, you'd better convert DVD VIDEO_TS to the popular video formats like H.264 MP4, MKV, AVI, etc.

To convert DVD Video_TS folder, Brorsoft Video Converter Ultimate the all-in-one DVD/Blu-ray/Video converter is highly recommended here.With it, you can effortlessly get your work done in just a few clicks. It can help you convert VIDEO_TS to all popular video formats .wmv, .avi, .mp4, .mpg, .flv, .mkv, .mpg, .mov, etc. Besides, it can also help you convert videos, DVD disc, Blu-ray disc, ISO/IFO files to a decent format you want. It's equivalent Mac version, please turn to Brorsoft iMedia Converter for Mac.

video-converter-trail imedia-converter-for-mac-trail

Guide: Convert Video_TS Files for Playing on PC/Mac with ease

Step 1. Install and launch the best DVD Video_TS converter, simply click "Load File" to load your Video_TS files to the program.
video-converter-ultimate.jpg

Step 2. Click "Format" drop-down menu, and pick up a proper format like "H.264 MP4" format in "Common Video" or "HD Video" category for VLC. MKV is also a good choice, as a container format it takes whatever you give it.
mp4-format-video-converter.gif

Step 3. Press the "Convert" button to convert DVD Video_TS files to popular video formats. When the conversion is complete, click "Open" button to quickly locate the videos and playback on Windows PC or Mac without hassle.